Using MS Word's AutoCorrect Facility
Microsoft Word's AutoCorrect facility can automatically correct common spelling mistakes and often-used acronyms, initialisms etc.
AutoCorrect can be turned on and off from the Tools menu:
- Go to the Tools menu and select Options.
- Click the Spelling & Grammar tab.
- In the Spelling area, check (on) or uncheck (off) the Check spelling as you type checkbox.
Adding entries to AutoCorrect
To manually add entries to AutoCorrect:
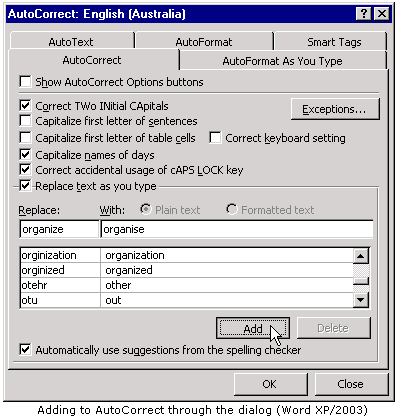
- Go to the Tools menu and select AutoCorrect (Word 2000) or AutoCorrect Options (Word XP/2003).
- In the AutoCorrect: English (Australia) dialog, go to the Replace field and enter the incorrect word or acronym/initialism (eg. organize, ATO).
- In the With field, enter the correct word or full text of the acronym/initialism (eg. organise, Australian Taxation Office).
- Click the Add button.
- Click the OK button.
Now, if you were to type: 'The ATO site can tell you how to organize your records', Word would automatically change the sentence to read: 'The Australian Taxation Office site can tell you how to organise your records', as you type.
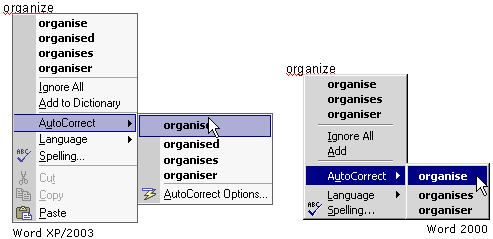
If you're using spell checking as you type, you can also add entries through the right-click menu:
- Right-click the underlined word and select AutoCorrect.
- From the sub-menu list of options, select the replacement word.
Note: AutoCorrect can be used for phrases as well as single words. If you find yourself constantly using phrases such as 'give consideration to' instead of 'consider', or 'in the near future' instead of 'soon', you can tell MS Word to automatically correct the phrase as you type.
AutoCorrect Options buttons
In Word XP/2003, you can also manage auto-corrections using AutoCorrect Options buttons. To turn on AutoCorrect Options buttons:
- Go to the Tools menu and select AutoCorrect Options.
- Tick the Show AutoCorrect Options buttons checkbox.
- Click the OK button.
Now, whenever Word makes an auto-correction, you can backspace (or move your mouse) to the correction to display the auto-correction underline:

Hover over the underline to show the AutoCorrect Options button, then click the button to display options:
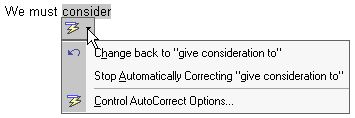
| Change back | : | Undoes the correction for this one instance. |
| Stop Automatically Correcting | : | Undoes the correction for this one instance, then deletes the auto-correction so it will not happen again. |
AutoCorrect Options buttons remain available for each correction until the document is closed. If you change your mind about changing an auto-correction, open the button again and select Redo AutoCorrect.
Deleting entries from AutoCorrect
To delete entries from AutoCorrect:
- Go to the Tools menu and select AutoCorrect (Word 2000) or AutoCorrect Options (Word XP/2003).
- Click the Spelling & Grammar tab.
- Scroll through the list at the bottom of the tab and click on the entry to be deleted.
- Click the Delete button.
- Click the OK button.
Australian Spell Checking in MS Word   Using MS Word's Custom Dictionaries Using MS Word's Custom Dictionaries
Related:
Plain English Alternatives for Jargon Words
Checking for Errors in Web Writing
|